Step-by-Step Guide and Expert Tips
10 min read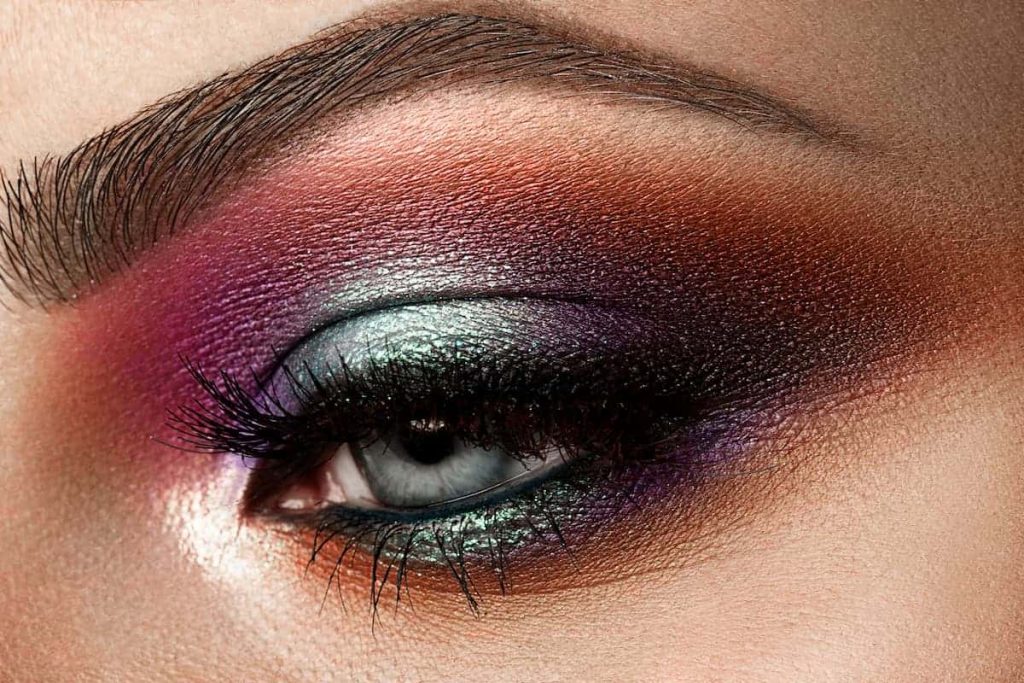
This post may contain affiliate links, which means I may receive a small commission, at no cost to you, if you make a purchase.
Ready to elevate your makeup skills to new heights? Discover the halo cut crease, a game-changing makeup technique that’s taking the beauty world by storm.
This technique is all about creating striking contrast and depth with a clever play of light and dark eyeshadows.
Worried it’s too complex, especially for beginners? Don’t be.
Our comprehensive guide will help you master the art of the halo cut crease. With a little courage and practice, you’ll become a pro in no time.
Fast Facts
- The halo cut crease technique combines elements of the cut crease and halo eye techniques, creating a spotlight effect.
- Use lighter shades for the center lid and darker matte shades for the crease and inner and outer corners of the eye.
- Common mistakes to avoid include not using eyeshadow primer, using too much product, neglecting blending, and incorrectly placing the center shade.
What Is the Halo Cut Crease Technique?
The halo cut crease eyeshadow technique combines the best of both worlds. It’s a fusion of the classic cut crease and halo eye techniques.
With a cut crease, you typically define a sharp line on the crease of your eyelid to create contrast. In the case of the halo cut crease, you will still use a crisp crease line, but with a twist.
Imagine drawing a line from the inner to the outer corner of your eyelid, creating a “cut” along the crease.
However, instead of just having a single color on the lid and a deeper shade in the crease, you introduce the halo element.
Doing so means placing a lighter, often shimmery, shade at the center of your eyelid, encircled by darker shades on the inner and outer corners.
This results in a stunning spotlight effect that enhances the dimension and allure of your eyes.
Choosing the Right Eyeshadow Colors for Halo Cut Crease
Let’s delve into each flattering color combination to achieve captivating halo cut crease looks!
Ideally, you should choose lighter shades for the center of your lid and darker matte shades in the crease for adding depth and balance to the overall look.
Here’s a table of suggestions:
| Halo Cut Crease Look | Center Lid Shade | Crease Shade |
|---|---|---|
| Glitter halo cut crease | Shimmering silver; champagne | Soft matte taupe; light brown |
| Rose gold halo cut crease | Luminous rose gold | Soft peach; dusty pink |
| Blue halo cut crease | Vibrant or pastel blue | Matte gray; taupe |
| Brown halo cut crease | Lighter, matte brown | Slightly deeper matte brown; taupe |
| Purple halo cut crease | Slightly lighter matte lavender; mauve | Deep purple |
How To Do a Halo Cut Crease
Excited to master the art of creating a halo eye cut crease? You’ll be glad to know it is not as complex as it sounds.
Here’s a guide to help you breeze through your first try.

Materials You Need
Before you begin, have the following ready:
Steps To Follow
Here’s an easy step-by-step guide on the halo cut crease creation that even beginners can follow!
- Prime your eyelids: Start with clean and moisturized eyelids. Create a smooth base by applying an eyeshadow primer to help your eyeshadow stay put and prevent creasing.
- Choose your colors: Select two eyeshadow shades, a lighter one for the center of your eyelids and a slightly darker one for the crease.
Remember, the crease shade should be a matte shade that complements the halo shade.
- Apply the makeup tape (optional): You can use a small piece of tape to guide you. Place the tape diagonally from the outer corner of your eye toward your brow.
- Apply the transition shade: Use a fluffy blending blush to apply a neutral transition shade to your crease. Choose a color slightly darker than your skin tone for the best results.
This shade will act as a base and help blend other colors seamlessly.
- Define inner and outer corners: With a small, tapered brush, apply a slightly darker eyeshadow shade to your eyelids’ inner and outer corners.
Quick Tip
Blend these shades softly in a windshield wiper motion to create depth.
- Blend corners with a transition shade: Using the same fluffy blush from step 4, blend the edges of the darker corner shades with the transition shade.
This step softens the transitions between colors and prevents harsh lines.
- Cut the crease: Using a small angled brush and concealer, draw a fake crease slightly above the real crease on the center part of your lid.
This step helps create the illusion of larger and more defined eyes, as well as having more control over the eyeshadow placement.
Apply the concealer all the way to the center, down to the upper lash line. Don’t forget to feather out the edges a little bit for a smooth transition.
- Apply the halo shade: Using your fingertip or a flat brush, apply the shimmering shade on the center of your eyelid where you applied the concealer.
Pat the color gently to build intensity while keeping the edges of the concealer defined.
- Blend and soften the edges: Add a bit of dark eyeshadow to the corners and blend in circular motions to ensure they look seamless with the halo shade.
- Remove the tape (if used): If you used tape, now is the time to gently peel it off and reveal a clean and precise halo cut crease look.
- Apply eyeliner and mascara: Apply a thin line of eyeliner along your upper lash line. Finish the look with a few coats of mascara to make your upper and lower lashes stand out.
- Clean up: Use a clean brush or makeup wipes to remove any eyeshadow fallout that might have landed on your cheeks during the application process.
For a visualization of the steps, here’s an easy halo cut crease tutorial that you can watch:
Tips for Perfecting a Halo Cut Crease
Before we teach you how to do a halo cut crease, we’ve created a list of tips to ensure you make a precise and clean look.
Make sure to follow these tips by heart to achieve spectacular results!
Choose Your Colors Wisely
Select eyeshadow colors that work together.
Pick a color palette, then opt for a lighter, shimmery shade for the center of your lid, and choose slightly darker shades for the inner and outer corners.
Focus on the Center
When applying the shimmering halo shade on the center of your eyelids, use your fingertip or a flat eyeshadow blush, just like this one from Nyx.
This technique ensures the color is properly set onto the center of the lid, creating a luminous focal point that catches the light.
Use Tape for Precise Lines
Eye tape for eyeshadow is a sticky strip used to create sharp eyeshadow lines, preventing eyeshadow fallout and ensuring precision for a refined, clean look.
Consider using an eye tape like this one from Rolybag to achieve a crisp and precise halo cut crease. Place a small piece of tape diagonally from the outer corner of your eye toward the end of your eyebrow.
The tape acts as a guide, helping you create a sharp line along the crease and keeping the inner part of your lids clean.

Use a Dense Brush for the Crease
When applying darker shades in the crease, use a denser brush similar to the ones from Haleys.
Doing so helps you place the color precisely along the crease line, providing better control and definition.
Common Mistakes To Avoid When Doing Halo Cut Crease
When attempting a halo cut crease eyeshadow look, there are several common mistakes to avoid to ensure a flawless outcome.
Skipping Eyeshadow Primer
Not using an eyeshadow primer, such as the ones from Milani, can lead to creasing, fading, and lacking of color vibrancy.
Always start with a primer to create a smooth canvas for your eyeshadow.
Using Too Much Product
Applying too much eyeshadow or concealer in the center of your lid for the halo can create a heavy, uneven appearance.
Apply eyeshadow in light layers and gradually build up the intensity. This approach prevents color overload and allows you to control the final effect.
Neglecting Blending
Blending is crucial for a seamless transition between colors. Neglecting to blend the edges can result in harsh lines and an uneven finish.
To ensure effective blending, use a clean, fluffy blending brush, like this one from Laura Geller to soften the edges of the eyeshadows.
Use windshield wiper motions to blend back and forth and create a smooth gradient between the shades.

Incorrect Placement of Center Shade
Knowing how to cut crease entails using the center shade correctly. Placing the center shade too high or too low on the lid can disrupt the halo effect.
The center shade should be focused on the middle of the lid to achieve the desired spotlight effect.
Using the Same Brush
Using a separate brush for each color is best to avoid muddying the shades.
If you only have one brush, you may still use it, but be sure to clean it before switching colors. Doing so maintains color clarity.
Overextending the Cut Crease Line
Extending the cut crease line too far toward the inner corner of the eye can make the eyes appear closer together. Keep the cut crease line proportionate to your eye shape.
When creating a cut crease, use concealer to carve out a clear line along the crease. Consider using a small, angled brush from E.l.f to ensure the line is sharp and defined.
Doing so offers a crisp contrast to the rest of the lid.
Take Your Time
Don’t rush while doing your eye makeup. Doing things in haste can lead to mistakes and uneven application.
Patience is key to achieving a polished look.
Smokey Eye, Halo Eye, Half Cut Crease vs. Cut Crease

Several advanced eyeshadow techniques can help accentuate the eyes in distinct ways.
Here’s a detailed comparison to avoid confusion on what makes these methods different from the cut crease technique used in the halo cut crease style.
Halo Eye vs. Cut Crease
The halo eye technique creates a luminous and captivating center point on the eyelid. It involves placing a lighter eyeshadow shade at the center of the lid, surrounded by darker shades.
Meanwhile, the cut crease technique forms a well-defined separation between the eyelid and the crease. It uses contrasting eyeshadow colors to emphasize this division.
The eyeshadow is applied along the crease line, followed by a sharp, contrasting shade on the lid.
Smokey Eye vs. Cut Crease
Next, what is the difference between a smokey eye and a cut crease?
The smokey eye technique entails blending multiple shades of eyeshadow seamlessly, transitioning from dark to light (from the outer to inner corners).
The goal is to create a diffused and smudged appearance around the eyes, resulting in a sultry and seductive vibe.
On the other hand, the cut crease technique focuses on making a clear line on your eyelids. It uses a bolder shade to create a line on the eye’s natural fold or crease.
Half Cut Crease vs. Cut Crease
What is the difference between a cut crease and a half cut crease?
Both techniques are sometimes difficult to distinguish, especially for beginners in makeup.
A half-cut crease technique introduces a creative twist to the traditional cut crease. It combines precision with softness by creating a sharp crease on only one half of the eyelid, usually the outer part.
This eye section is defined with a distinct eyeshadow line, while the inner portion remains blended, allowing for a gradual transition between the two.
A regular cut crease, which people also call a full cut crease, emphasizes a clear distinction between the eyelid and crease by using a contrasting shade.
A cut crease creates a sharp crease that extends to the whole crease of the eyes.

Frequently Asked Questions
Is It Easier To Do Halo Cut Crease on Hooded Eyes Than on Monolids?
Not necessarily. The challenge of doing a halo cut crease lies not in the eye shape itself but in adapting the technique to suit the unique characteristics of each eye structure.
Here are our tips for doing a halo cut crease on monolids:
- Create a halo cut crease slightly above where the natural crease would be if you had one.
- Enhance the illusion of depth by blending darker shades on the outer and inner corners, while keeping the center of the lid brighter.
- Use a lid tape to provide a guide for where to place the crease shade. Doing so can help in creating a temporary crease, giving the illusion of a more prominent lid space.
Can You Combine a Halo Cut Crease With Other Eyeshadow Techniques?
Yes!
You can creatively combine a halo cut crease with various eyeshadow techniques to craft captivating eye makeup looks.
- Pair it with a smokey eyeshadow for added drama.
- Integrate a winged eyeliner to define your upper lash line.
- Apply glitter for a glamorous touch.
- Experiment with vibrant colors for a colorful outcome.
- Merge the look with unique shapes like a half-moon for an artistic twist.
These combinations allow you to infuse your style and creativity, resulting in eye-catching and multidimensional eye makeup!
Create Magic by Mastering the Halo Cut Crease!
The halo cut crease is not just a trend. It’s a technique that allows creativity to shine and offers flexibility to experiment with the symphony of shades in your palette.
Our comprehensive guide is designed to help you master this look, offering step-by-step instructions that make the process accessible and fun.
So why not give it a try? Practice doing the halo cut crease trend and let your eyes narrate your style story!
Want To Learn More Eye Makeup Techniques?
Check these out: